Integrating Acra with Django app: step-by-step tutorial #
AcraWriter is available in Acra Enterprise Edition only.
Zones are deprecated since 0.94.0, will be removed in 0.95.0.
This tutorial is an extensive step-by-step guide for those who have never used Themis and Acra before. There is also a much shorter version for the experienced Acra users. If it’s your very first encounter with Acra, keep reading.
Intro #
Acra is a database security suite, which protects you against data leaks and many typical application threats through strong selective encryption and intrusion detection capabilities.
Acra is most useful for:
- Selective protection of sensitive data,
- Autosharded databases,
- Microservices,
- Situations with severe time constraints (aka “pressing deadlines” ;).
Acra is developer-oriented, with convenient infrastructure, and easily provides strong security and full granular control over your data.
The main basic components of Acra are:
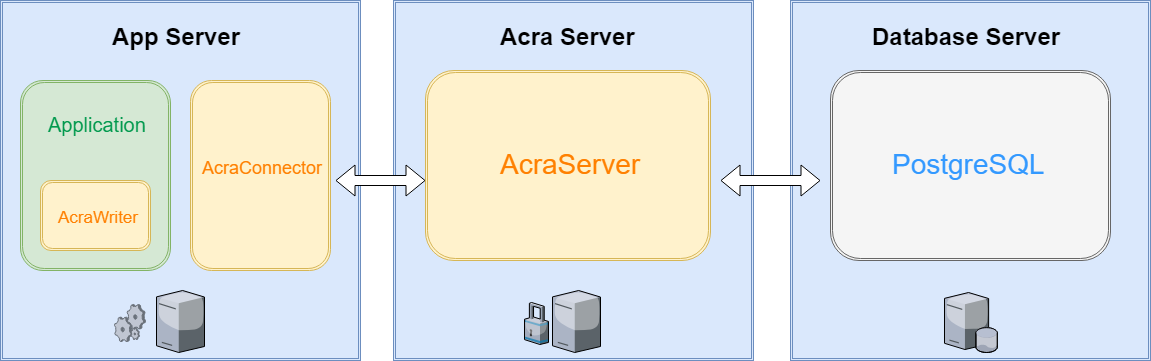
- AcraServer - a separate service that runs in an isolated environment (separate virtual machine or physical server), which is responsible for holding all the secrets required to decrypt the data and for actually decrypting this data.
- AcraWriter - a client-side library, which integrates into the app flow either through ORM or directly, and provides the means to encrypt the sensitive data via generating AcraStructs.
This tutorial guides you through a typical process of integrating Acra into a Python web app. More specifically - into an app running on Django framework using a popular example where many Django users start their development journey with - djangoproject.com repository. We’ll integrate Acra into Django Project to provide cryptographic protection of blog posts.
Additionally, you can look on our engineering demo where we show how to run our example with docker-compose with all infrastructure supported by Acra: AcraConnector (deprecated since 0.91.0), AcraWebConfig (deprecated since 0.91.0), AcraAuthManager (deprecated since 0.91.0), Prometheus, Jaeger.
Security model #
Acra provides selective encryption and only protects the records you want to protect.
With AcraWriter, the records to be encrypted are wrapped in a function that outputs an AcraStruct (cryptographic container decryptable by AcraServer). AcraStruct is then stored in a database.
In Acra’s threat model, we assume that anything but AcraServer can be compromised and that any piece of data can leak outside. For Acra to stay secure, only AcraServer must stay secure. However, if AcraServer is compromised, the whole implementation of Acra will make no sense.
With Acra we strive to provide 2 main programmatic security guarantees:
-
G1: Even if all the other parts of the system are compromised, as long as AcraServer is secure, the attacker won’t collect enough data for decryption of the protected materials (database entries in our case).
-
G2: If the attacker alters the app’s behaviour in such a way that makes it request all the protected (encrypted) data from the database, AcraServer detects it and reacts accordingly by triggering pre-set alarms and panic blocks. This is currently carried out with the help of poison records in the database, which would have never been called up - except for an event of a hack/breach. In the future, more intrusion detection features besides poison records are planned.
If it is explicitly stated that the output for Zone ID must precede the AcraStruct, AcraServer will search for certain strings called Zone IDs (“Zones”) when analysing the database output stream. Zones let Acra know that within this record a private key corresponding to the Zone ID should be used for the actual decryption of AcraStructs.
Zones are the way to cryptographically compartmentalise records in an already-encrypted environment. They rely on different private keys on the server side. When using Zone keys, you get an additional 3rd guarantee:
- G3: If the attacker manages to compromise the system and modify the app to extract all the records protected by Zone keys, he/she will have to reverse-engineer both the storage model and the Zone identification to be able to request all of them correctly.
Deploying infrastructure #
In a perfect world, you’d be running different elements of Acra, as well as your database, on 3 separate machines - one for PostgreSQL, one for AcraServer, and one for AcraWriter + your Django web app. This implies an immediate introduction of Acra into a real production setting, which we realise is far from a realistic course of events (at least on your very first try of Acra). So this tutorial is more focused on the things you can try out by hands and tinker with on just 2 or even 1 machine through the creation of different users and containers (i.e. Docker, a test-only implementation of which for Acra is described at the end of this tutorial).
In this detailed architectural scheme we see how components of Acra, application, and database relate and interact with
each other:
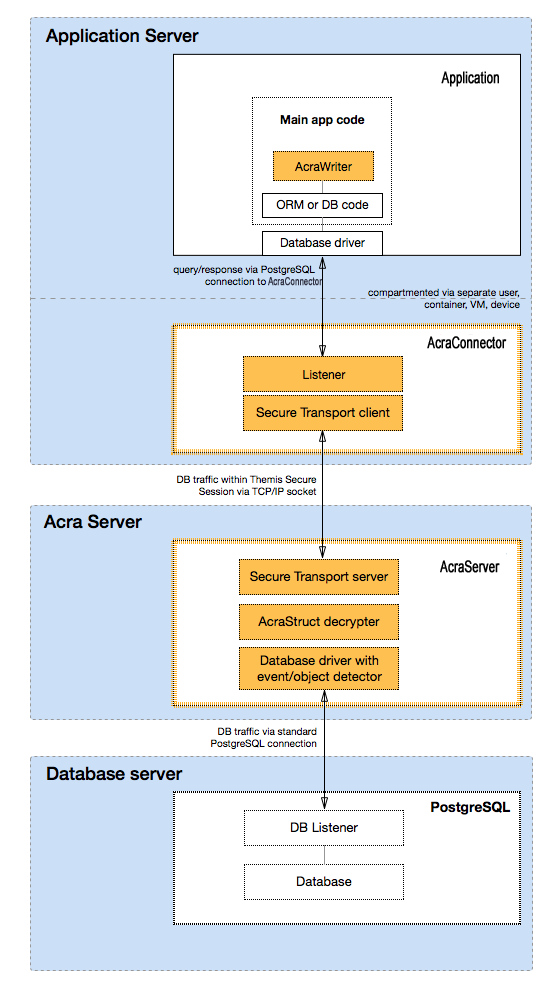
Put simply, the application talks to AcraServer. AcraServer sends a request to the database using the regular PostgreSQL protocol and receives an answer. If AcraServer detects the presence of AcraStruct while parsing the answer, it attempts to decrypt it and replace AcraStruct with a plaintext result in the answer (if decryption is unsuccessful, AcraServer will forward the answer as is). AcraServer returns the data to the application. If Zones are used, AcraServer will use a corresponding private key to decrypt the next detected AcraStruct upon detecting ZoneId. AcraServer will ignore the AcraStruct if no Zone ID is detected before the AcraStruct.
All the dependencies mentioned in this tutorial need to be installed on all the machines/containers running Acra unless it’s explicitly specified that some Acra components should only be installed for a separate user/machine running AcraServer. All the commands starting with ‘go’ are meant to be executed from ‘acra’ folder (the folder with the repository code) on any machine.
In this tutorial, we assume that you have a fully operational PostgreSQL
(as Acra transfers and receives data “as is” to and from PostgreSQL database and then processes it - parses the messages -
according to the PostgreSQL protocol) and operate on Linux machines (with Python environment and Django framework installed).
It’s also crucial that you have libssl-dev installed with libcrypto.so in $PATH before proceeding.
This might seem daunting, but in reality, Acra is easy to install. Let’s go!
Step 1. Install Acra #
Installation guide - here you can find out how to install Acra from package repository or sources.
Step 2. Generate storage keys, master key and TLS certificates #
Generate master key for AcraServer:
acra-keymaker --generate_master_key=master.key
Export the key to the environment variable in base64 format:
export ACRA_MASTER_KEY=`cat master.key | base64`
Generate TLS certificates using some hints on certificate generation page
After you successful certificate generation, you should use it to generate corresponding storage keys
Generate keys into ./.acrakeys directory structure using acra-keymaker:
acra-keymaker \
    --client_id='' \
    --keystore=v1 \
    --tls_cert=<path-to-generate-certificate> \
    --generate_acrawriter_keys
./.acrakeys/TLS_CERT_ID_storage
./.acrakeys/TLS_CERT_ID_storage.pub
Here TLS_CERT_ID is a placeholder for the ID name extracted from provided TLS certificate.
The generator will generate and place the keys into the .acrakeys directory (you can change this with --keys_output_dir argument).
or a few minutes, let the keys rest where they are - they will be necessary after you have installed AcraServer and AcraWriter (please see Key management in the Themis documentation).
AcraServer #
Step 3. Launch AcraServer #
Yet another reminder that AcraServer needs to be installed on a separate computer/virtual machine/container.
Create a new user for AcraServer:
sudo useradd -m acra-server
sudo su acra-server
cd ~/
Launch AcraServer with:
acra-server --db_host=127.0.0.1 --tls_ca=/ssl/root.crt --tls_cert=/ssl/acra-server.crt --tls_key=/ssl/acra-server.key
The command above can be complemented with -v to adjust the listener port and to add logs quickly.
There are more parameters available, and you can find them in the
documentation page for AcraServer, but for the present goal - namely,
for an easy integration of Acra into a Django app, the default parameters will do.
You can also run with the options from config. Copy the example config:
$REPO_DIR/configs/acra-server.yaml
or from
$GOPATH/src/github.com/cossacklabs/acra/configs/acra-server.yaml
Or generate the config yourself:
acra-server --dump_config > acra-server.yaml
and run:
acra-server --config_file=acra-server.yaml
Proper logging is set with:
acra-server --db_host=127.0.0.1 --tls_ca=/ssl/root.crt --tls_cert=/ssl/acra-server.crt --tls_key=/ssl/acra-server.key -v
By default, AcraServer listens on port 9393, but you can set a custom port if there is a need:
acra-server
    --db_host=127.0.0.1 \
    --tls_ca=/ssl/root.crt \
    --tls_cert=/ssl/acra-server.crt \
    --tls_key=/ssl/acra-server.key \
    --incoming_connection_port=3000
Here 3000 is the customisable part.
Integration #
Step 4. Integrating Acra with Django #
Since in our example we’ll be integrating Acra into DjangoProject to protect blog posts, you need to clone DjangoProject’s repository with:
git clone https://github.com/django/djangoproject.com.git
AcraWriter comes into play next. It is basically Themis that is generating AcraStructs with keys you’ve made available to AcraWriter. You can encrypt sensitive data by generating AcraStructs with AcraWriter anywhere in your app. AcraWriter can be used whenever you need to encrypt sensitive records. Install AcraWriter:
pip install acrawriter
AcraWriter should have AcraServer’s public key. This is necessary for encryption of AcraStructs in such a way that would only be read by AcraServer.
And AcraServer’s public key(s) to the public storage keys need to be given to AcraWriter. This is used for decryption of
AcraStructs that AcraWriter has produced.
Put .acrakeys/yourID_storage.pub into any folder where your AcraWriter’s function can access it.
To continue with the correct key distribution for our purposes, you need to save AcraServer’s public key to settings as
ACRA_SERVER_PUBLIC_KEY through executing the following:
# djangoproject/settings/common.py
import json
import os
from pathlib import Path
from base64 import b64decode
.
.
.
ACRA_SERVER_PUBLIC_KEY = b64decode(SECRETS.get('acra_storage_public_key'))
This AcraServer public key needs to be copied and pasted into a conf/secrets.json created for this purpose in a form of a base64 string:
{
    . . .
  "acra_storage_public_key": "VUVDMgAAAC1w3M1uArNP+AWNhmOi6+bR6SXadlPbAh3XFnBuOnLziPeHn70T"
    . . .
}
Add TLS configuration:
# djangoproject/settings/common.py
DATABASES = {
    'default': {
        ...
        'OPTIONS': {
            'sslmode': 'verify-full',
            'sslcert': '<path-to-cert>',
            'sslkey': '<path-to-key>',
            'sslrootcert': '<path-to-root-cert>',
        },
    },
    'trac': {
        ....
        'OPTIONS': {
            'sslmode': 'verify-full',
            'sslcert': '<path-to-cert>',
            'sslkey': '<path-to-key>',
            'sslrootcert': '<path-to-root-cert>',
        },
    }
}
Next, use model fields from acrawriter.django module:
# blog/models.py
. . .
import acrawriter.django
. . .

class Entry(models.Model):
    . . .
    headline = acrawriter.django.CharField(max_length=200)
    summary = acrawriter.django.TextField()
    summary_html = acrawriter.django.TextField()
    body = acrawriter.django.TextField()
    body_html = acrawriter.django.TextField()
    author = acrawriter.django.CharField(max_length=100)
    . . .
Continued:
# members/models.py
. . .
import acrawriter.django
. . .


class IndividualMember(models.Model):
    email = acrawriter.django.EmailField(unique=True)
    contact_email = acrawriter.django.EmailField()
    billing_email = acrawriter.django.EmailField(blank=True, help_text='If different from contact email.',)
    . . .
Run migrations to bring it all together:
python manage.py makemigrations
python manage.py migrate
If you’ve been successful with implementing all the previous steps, your Django app should now be connecting to your AcraServer. To proceed with integration, change db_host/trac_db_host in your conf/secrets.conf to 127.0.0.1 like this:
{
  "secret_key": "xyz",
  "db_host": "127.0.0.1",
  "trac_db_host": "127.0.0.1",
  "acra_storage_public_key": "VUVDMgAAAC1w3M1uArNP+AWNhmOi6+bR6SXadlPbAh3XFnBuOnLziPeHn70T"
}
The final step in the process of integration Acra with Django Project is adding AcraWriter to the requirements/common.txt:
. . .
stripe==1.43.0
Sphinx==1.4.9
acrawriter==1.0.0
This completes the process of integrating a fully operational Acra into your Django web app in a real-life setup that uses different machines/users.
Result #
To test your Acra setup:
-
Upon integrating AcraWriter into your code, try generating an AcraStruct from some payload. If you succeed in running AcraWriter code, it will mean that the keys are located in the expected places.
-
Write a row with AcraStruct into the database directly. If you see the decrypted payload in the response, the scheme works properly.
To test the work of Acra on your DjangoProject web app, launch it locally, and go to 127.0.0.1:8000/admin/. Add a new
Entry post or a new IndividualMember and make sure that everything is displayed correctly in the list of objects.
Then connect to the database and see for yourself that the data from the table has turned into unintelligible encrypted
text - use:
psql -h127.0.0.1 -p 5432 -U test --dbname=djangoproject -c "select * from blog_entry;"
If the database returns all the data it contains in encrypted form, everything is working properly, and you’ve successfully integrated Acra into your Django app!
If You Want to Try Acra in Containers First #
We’ve made some special effort to make Acra work with Docker. However, please remember that using Acra with containers is violating its basic security guarantee. Docker is immutable, and zones/keys are not. This means you might want to attach some storage and end up leaving keys accessible to attackers. So use Acra with Docker for testing purposes only.
To simply test the waters of using Acra, you can use pre-made config files and examples below - they can also serve as a reference for integrating Acra with a Django app.
You’ll need to download Acra, just like it was described above:
git clone https://github.com/cossacklabs/acra
cd acra
And start AcraServer and PostgreSQL in separate Docker containers:
docker-compose -f docker/docker-compose.pgsql-ssl-server-ssl.yml up -d
-fuse specified docker-compose*.yml file-drun in background
After executing this command, you will have a running PostgreSQL with test:test user:password with forwarded 5432
port, AcraServer with keys that you generated above.
Note: Don’t forget to stop your local PostgreSQL if you run it before launching the Docker with PostgreSQL in a container, otherwise you’ll get an error from 2 instances of an application trying to listen on the same port.
By default, Docker will create 3 containers with the following names: docker_acra-server_1, and docker_postgresql_1.
Install the example application dependencies:
virtualenv --python=python3 acra_env
source acra_env/bin/activate
pip install -r examples/python/requirements.txt
Create a database:
echo "create database acra with encoding utf8;" | psql -h 127.0.0.1 -p 5432 -U test
You’ll be asked to input the password for PostgreSQL (test), and you’re ready to proceed.
Using Acra in Docker Without Implementing Zones #
Let’s print the contents of the database:
python examples/python/example_without_zone.py --public_key=.acrakeys/client_storage.pub --db_user=test --db_password=test --host=127.0.0.1 --port=5432 --print
You should see nothing because there is no data in the database. But let’s add something:
python examples/python/example_without_zone.py \
    --public_key=.acrakeys/client_storage.pub \
    --db_user=test \
    --db_password=test \
    --host=localhost \
    --tls_root_cert=./docker/ssl/ca/example.cossacklabs.com.crt \
    --tls_key=./docker/ssl/acra-client/acra-client.key \
    --tls_cert=./docker/ssl/acra-client/acra-client.crt \
    --ssl_mode=verify-full \
    --port=9393 \
    --data="data1"

python examples/python/example_without_zone.py \
    --public_key=.acrakeys/client_storage.pub \
    --db_user=test \
    --db_password=test \
    --host=localhost \
    --tls_root_cert=./docker/ssl/ca/example.cossacklabs.com.crt \
    --tls_key=./docker/ssl/acra-client/acra-client.key \
    --tls_cert=./docker/ssl/acra-client/acra-client.crt \
    --ssl_mode=verify-full \
    --port=9393 \
    --data="data2"
And let’s try printing now:
python examples/python/example_without_zone.py --public_key=.acrakeys/client_storage.pub --db_user=test --db_password=test --host=127.0.0.1 --port=5432 --print
You will see an unreadable mishmash of numbers and letters - something like this:
b'""""""""UEC2\x00\x00\x00-d\x18e\xbc\x03.\x9fi\xecc\xbb\xfe\xa0...
To make sure that the data is really encrypted, you can connect directly to the database and make pure select in the PostgreSQL terminal:
echo "select * from test_example_without_zone" | psql -h127.0.0.1 -p5432 -Utest acra
Now the data is encrypted and you know it. Let’s read the data directly thought AcraServer by specifying port 9393 instead of 5432:
python examples/python/example_without_zone.py \
    --public_key=.acrakeys/client_storage.pub \
    --db_user=test \
    --db_password=test \
    --tls_root_cert=./docker/ssl/ca/example.cossacklabs.com.crt \
    --tls_key=./docker/ssl/acra-client/acra-client.key \
    --tls_cert=./docker/ssl/acra-client/acra-client.crt \
    --host=localhost \
    --port=9393 \
    --print
You will see the decrypted data via Acra in the data column, i.e. b'data1'. Acra is working!
Using Acra in Docker with Zones #
Shut down the previous active Docker containers before proceeding with this method! Use:
docker-compose -f docker/docker-compose.pgsql-ssl-server-ssl.yml down
Use this .yml file to start AcraServer that supports Zones:
docker-compose -f docker/docker-compose.pgsql-ssl-server-ssl_zonemode.yml up -d
This command is similar to the command used for starting AcraServer without the support of Zones, but now AcraServer will also forward port 9191, which should be used for requests to HTTP API (adding Zones).
Create the database:
echo "create database acra with encoding utf8;" | psql -h 127.0.0.1 -p 5432 -U test
Print the data contained in the database:
python examples/python/example_with_zone.py --db_user=test --db_password=test --host=127.0.0.1 --port=5432 --print
Just like in the example above (using Docker with Acra without Zones), the command should print nothing, but now let’s
add some data by running a Python script example_with_zone.py for that:
python examples/python/example_with_zone.py \
    --db_user=test \
    --db_password=test \
    --tls_root_cert=./docker/ssl/ca/example.cossacklabs.com.crt \
    --tls_key=./docker/ssl/acra-client/acra-client.key \
    --tls_cert=./docker/ssl/acra-client/acra-client.crt \
    --host=localhost \
    --port=9393 \
    --data="data1"
The script will print:
data: data1
zone: DDDDDDDDmufclpqHJfnTDJZW
saved with zone: DDDDDDDDmufclpqHJfnTDJZW
It made a request to HTTP API of AcraServer to add a new Zone and used the response (Zone ID and
Zone public key) for encrypting the data. zone: DDDDDDDDmufclpqHJfnTDJZW is the Zone ID that should be used for
fetching decrypted data via AcraServer.
If we print the data now, we will see something like this:
python examples/python/example_with_zone.py --db_user=test --db_password=test --host=127.0.0.1 --port=5432 --print
id  - zone - data -   raw_data
92075 - b'without zone' - b'""""""""UEC2\x00\x00\x00-E\xf90\x93\x031]\xb8\xd9\x04\xf3\xc1R\x95U1sd\xcd\xe6\xca\xef4\x14K.\xd3\xa7\xbb\x8d\x80\x18\x84v4o\x1d \'\x04&T\x00\x00\x00\x00\x01\x01@\x0c\x00\x00\x00\x10\x00\x00\x00 \x00\x00\x00Ri\xf0,\x91\xe8\xb3Y\x861\xaend\x10\x89t\xe3\xa6\x8e\xe3\xbf8+."\x17\xd2s\xd3\xc4m\xa5\xbf+\xce\x85G9\xca\x15\x01X\xd3\x87;$2\xed\xd5\xca7\xec!\x07\xcb\xee\xd9\xd7\xd8Y1\x00\x00\x00\x00\x00\x00\x00\x00\x01\x01@\x0c\x00\x00\x00\x10\x00\x00\x00\x05\x00\x00\x00\x9f\xd0\x1f\x7fkZ\xaah\xb9\xe2s\x15\xwj2\x0b[o\r\x01\xcf\xacC\xdbt\x86\xae\xd4\xb2\xb8' - (zone: DDDDDDDDmufclpqHJfnTDJZW) - data1
Here b'without zone' is a hardcoded string in example script for demonstrating usage without Zones.
Now let’s try to print what’s happening on port 9393:
python examples/python/example_with_zone.py \
    --db_user=test \
    --db_password=test \
    --tls_root_cert=./docker/ssl/ca/example.cossacklabs.com.crt \
    --tls_key=./docker/ssl/acra-client/acra-client.key \
    --tls_cert=./docker/ssl/acra-client/acra-client.crt \
    --host=localhost \
    --port=9393 \
    --print
Nothing will happen because now AcraServer fails to match Zone ID and it doesn’t decrypt the data. All the logging happens on AcraServer only. This needs to be done to make sure that attackers are unable to figure out what exactly is wrong with their attempts at performing decryption.
With a correct Zone ID and AcraServer listening on port 9393 everything will work correctly (use your own Zone ID, it must be different from the one provided in the example below):
python examples/python/example_with_zone.py \
    --db_user=test \
    --db_password=test \
    --host=localhost \
    --tls_root_cert=./docker/ssl/ca/example.cossacklabs.com.crt \
    --tls_key=./docker/ssl/acra-client/acra-client.key \
    --tls_cert=./docker/ssl/acra-client/acra-client.crt \
    --port=9393 \
    --print \
    --zone_id=DDDDDDDDmufclpqHJfnTDJZW
Now we’ll be able to see the decrypted data:
use zone_id:  DDDDDDDDmufclpqHJfnTDJZW
id  - zone - data -   raw_data
92075 - b'DDDDDDDDmufclpqHJfnTDJZW' - data1 - (zone: DDDDDDDDmufclpqHJfnTDJZW) - data1
Let’s see how the data is stored in the database:
echo "select * from test_example_with_zone" | psql -h127.0.0.1 -p5432 -Utest acra
And if we try to print the data with incorrect Zone ID we’ll see that AcraServer didn’t decrypt it and passed the data as is:
python examples/python/example_with_zone.py \
    --db_user=test \
    --db_password=test \
    --host=localhost \
    --tls_root_cert=./docker/ssl/ca/example.cossacklabs.com.crt \
    --tls_key=./docker/ssl/acra-client/acra-client.key \
    --tls_cert=./docker/ssl/acra-client/acra-client.crt \
    --port=9393 \
    --print \
    --zone_id=DDDDDDDDINCORRECTZONEIDW
Congratulations! Acra is now working with Zones!
Conclusion #
As you can see, establishing cryptographic protection for the data in your web app with Acra is a very straightforward
and simple process. We hope that this tutorial was fun and informative and that you will be using Acra in the future.
If you only tried the Docker-based examples, try running Acra in a real world setup - it’s just as convenient.
You can also check out a similar Acra tutorial for Ruby on Rails app.
